
The Venmar Jazz Range Hood is a sleek, chimney-style solution designed for modern kitchens. It offers efficient airflow and a stylish design, enhancing cooking experiences while blending seamlessly with contemporary decor. This introduction provides an overview of its features and the importance of the manual for optimal use.
1.1 Overview of the Venmar Jazz Range Hood
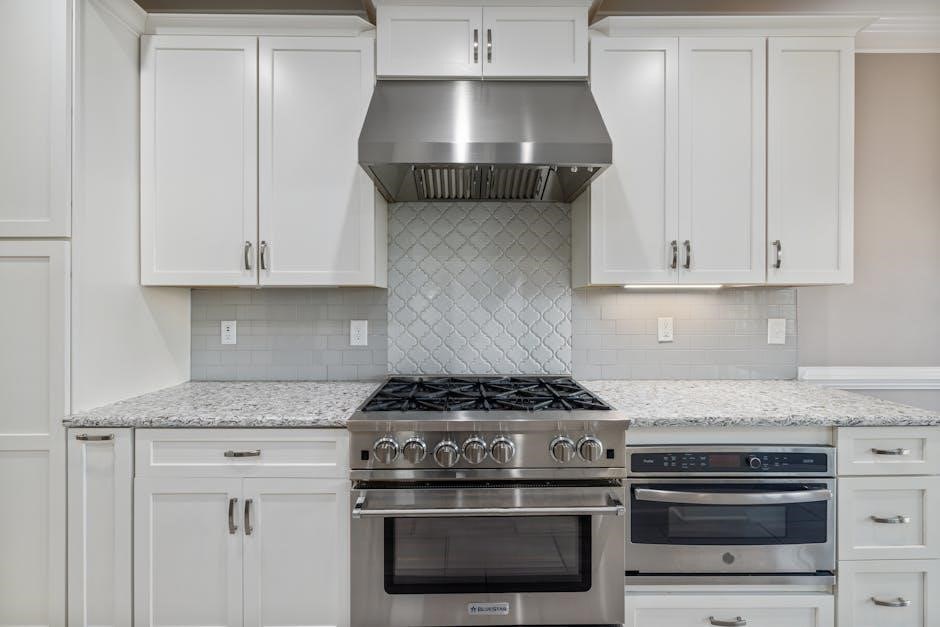
The Venmar Jazz Range Hood is a stylish, chimney-style ventilation solution designed to elevate modern kitchens. It combines sleek design with robust performance, offering efficient airflow to capture cooking impurities. The hood is available in various models, such as the VJ603302SS, and is intended for domestic use. Its compact profile and adjustable height make it versatile for different kitchen layouts. The unit features halogen lighting for clear cooktop visibility and a user-friendly control panel. With options for ducted and non-ducted installations, it caters to diverse ventilation needs. This range hood is built to enhance both functionality and aesthetics, ensuring a seamless integration into any kitchen setting.
1.2 Importance of the Manual for Users
The manual is essential for understanding the Venmar Jazz Range Hood’s features, installation, and maintenance. It provides critical safety guidelines, warranty details, and troubleshooting tips, ensuring optimal performance and longevity. Users can learn proper installation methods, whether ducted or non-ducted, and how to maintain airflow efficiency. The manual also outlines cleaning schedules for filters and light bulbs, ensuring the hood functions effectively. By following the manual, users can prevent common issues and extend the product’s lifespan. It serves as a comprehensive guide for maximizing the hood’s potential while adhering to safety standards and manufacturer recommendations.

Key Features of the Venmar Jazz Range Hood
The Venmar Jazz Range Hood features a sleek design, powerful airflow, advanced lighting, and intuitive controls. It ensures efficient ventilation with quiet operation and energy efficiency.
2.1 Design and Build Quality
The Venmar Jazz Range Hood boasts a sleek, contemporary design with a durable stainless steel construction; Its chimney-style profile adds a modern aesthetic to any kitchen. Built with high-quality materials, it ensures long-lasting performance and resistance to corrosion. The hood’s surface is smooth and easy to clean, maintaining its polished appearance. Its slim design allows for optimal space utilization while providing a sophisticated look. The overall build quality reflects Venmar’s commitment to excellence, ensuring both functionality and style in your cooking space.
2.2 Performance and Airflow Capacity
The Venmar Jazz Range Hood delivers impressive performance with a powerful motor designed to efficiently capture cooking fumes and odors. It offers a robust airflow capacity, ensuring optimal ventilation in your kitchen. The hood is designed to handle heavy cooking demands, providing consistent and reliable performance. For best results, it should be installed at a height of 24 to 30 inches above the cooking surface, ensuring efficient airflow and proper ventilation. This setup minimizes cooking odors and moisture, creating a cleaner and more comfortable cooking environment. Its performance capabilities make it a reliable choice for modern kitchens, balancing power and quiet operation effectively.
2.3 Lighting System and Controls
The Venmar Jazz Range Hood features a high-quality lighting system designed to provide clear visibility over your cooktop. It uses UL-approved halogen bulbs (Type JC, 12V, 20W maximum, G-4 Base), which are included for convenience. The lighting system is easy to maintain, with a simple process for replacing bulbs. To replace, gently push the rim upward and remove the old bulb before installing the new one. The hood also comes with intuitive controls that allow you to adjust both the fan speed and the lighting to suit your cooking needs. This combination of functional lighting and user-friendly controls enhances your overall cooking experience, ensuring both efficiency and comfort in the kitchen. Proper bulb replacement ensures consistent performance, as outlined in the manual.
2.4 Noise Levels and Energy Efficiency
The Venmar Jazz Range Hood is designed to operate quietly while maintaining high performance. Its efficient motor ensures minimal noise levels, making it suitable for home kitchens. The hood is also energy-efficient, with features that optimize airflow while reducing energy consumption. Proper installation, as outlined in the manual, ensures optimal performance and energy savings. The hood’s design includes eco-friendly components, aligning with modern energy-conscious standards. By balancing power and efficiency, the Venmar Jazz Range Hood provides a reliable and environmentally friendly solution for kitchen ventilation needs. Regular maintenance, such as filter cleaning, further enhances its energy efficiency and overall performance.
Installation Requirements
Proper installation requires considering ducted or non-ducted setups, electrical connections, and secure mounting. Ensure adequate ventilation for optimal performance and safety.
3.1 Ducted vs. Non-Ducted Installation
Choosing between ducted and non-ducted installation depends on your kitchen’s setup. A ducted system vents air outside, offering superior airflow and odor removal, while a non-ducted system recirculates air using a charcoal filter. For ducted, ensure proper ductwork planning and installation. Non-ducted requires a specific kit, like HRKMSS or HRKBSS, depending on the model. Both options need correct electrical connections and mounting for safety and efficiency. Always follow the manual’s guidelines for the chosen setup to ensure optimal performance and compliance with safety standards.

3.2 Planning the Ductwork Layout
Planning the ductwork layout is crucial for optimal performance of the Venmar Jazz Range Hood. Ensure the duct run is as short and straight as possible to maximize airflow efficiency. Avoid sharp turns and use smooth transitions to minimize air resistance. The duct diameter should match the hood’s outlet size, typically 6 inches. Use high-quality, insulated ducting to reduce noise and heat loss. Plan the route to avoid obstacles and ensure compliance with local building codes. Proper planning prevents poor suction and ensures effective ventilation. Always refer to the manual for specific recommendations tailored to your model and installation type.
3.3 Electrical Requirements and Connections
Ensure the Venmar Jazz Range Hood is connected to a dedicated 120V, 60Hz electrical circuit. The hood requires a 15 or 20-amp circuit, depending on the model and features like lighting. Use a UL-listed, 3-wire power cord or hardwire the connection as specified in the manual. Avoid sharing the circuit with other high-power appliances to prevent voltage drops. For models with halogen lighting, use JC 12V, 20W G-4 base bulbs. Always turn off the power at the circuit breaker before servicing. Consult a licensed electrician if unsure, and follow local electrical codes for safe installation.
3.4 Mounting the Range Hood
Mounting the Venmar Jazz Range Hood requires careful planning to ensure stability and proper alignment. Use the provided mounting bracket and screws to secure the hood to the wall or ceiling, depending on the model. Ensure the hood is level and aligned with the cooking surface for optimal performance. For gas ranges, the bottom of the hood must be at least 24 inches above the cooking surface, while for electric ranges, it should be no more than 30 inches. Double-check all connections and ensure the hood is securely fastened to prevent vibration or movement during operation. Consult a professional if unsure to guarantee safety and proper installation.

Step-by-Step Installation Guide
This guide provides a detailed process for installing the Venmar Jazz Range Hood, including unpacking, assembling, and connecting components to ensure a smooth and proper setup.
4.1 Unpacking and Preparing the Components
Begin by carefully unpacking the Venmar Jazz Range Hood and inspecting for any damage. Ensure all components, including the hood, chimney, ductwork, screws, and filters, are included. Organize the parts in a clean, accessible area. Check the manual for specific instructions on identifying each component. Verify the duct kit and electrical connectors are compatible with your setup. Lay out tools like a screwdriver, measuring tape, and drill for the installation process. Familiarize yourself with the parts before proceeding to ensure a smooth assembly and installation.
4.2 Assembling the Chimney and Hood
To assemble the chimney and hood, align the chimney section with the mounting bracket on the hood. Secure it using the provided screws, ensuring a tight fit. Connect additional chimney sections if needed, following the manual’s guidance for proper height adjustment. Once assembled, check the stability of the chimney and hood connection. Ensure all joints are sealed to maintain airflow efficiency. Proper assembly is crucial for optimal performance and safety. Follow the manual’s diagrams for precise alignment and tightening specifications. Double-check that all components are firmly attached before moving on to the next installation step.
4.3 Connecting the Ductwork
Connect the ductwork to the range hood’s exhaust outlet, ensuring a secure and airtight seal. Use the provided or recommended ducting materials to maintain optimal airflow. For ducted installations, attach the duct to the hood’s vent outlet and route it through the planned layout, avoiding sharp bends. Secure all connections with duct tape or clamps. If using a non-ducted setup, install the non-duct kit according to the manual. Verify that the ductwork is properly aligned and leak-free. Consult the manual for specific fitting recommendations and additional components like dampers or vent caps. Ensure the ductwork is as short and straight as possible for maximum efficiency.
4.4 Finalizing the Installation
After connecting the ductwork and mounting the range hood, ensure the unit is properly positioned and leveled. Secure all screws and brackets tightly to prevent any movement during operation. Double-check electrical connections to confirm they are safe and meet local codes. Inspect the ductwork for any leaks or loose connections, sealing them with tape if necessary. Finally, test the range hood by turning it on to ensure proper airflow and lighting function. Refer to the manual for any additional adjustments or settings. Once everything is verified, clean the exterior and ensure all components are securely in place for optimal performance and safety.

Maintenance and Cleaning Tips
Regular cleaning and filter maintenance are essential for optimal performance. Ensure all components are free from grease and debris to maintain efficiency and safety.
5.1 Regular Cleaning of the Hood and Filters
Regular cleaning is crucial for maintaining the performance of your Venmar Jazz Range Hood. Use a soft cloth and mild detergent to wipe the exterior and interior surfaces, avoiding abrasive materials that may scratch the finish. The aluminum filters should be cleaned every 1-3 months by soaking them in warm, soapy water. For non-ducted installations, the charcoal filter should be replaced every 4-6 months to ensure proper odor absorption. Always turn off the power before cleaning and avoid using harsh chemicals. Regular maintenance ensures efficient airflow and prevents grease buildup, which can hinder performance and safety.
5.2 Replacing the Charcoal Filter (Non-Ducted)
For non-ducted installations, the charcoal filter in your Venmar Jazz Range Hood should be replaced every 4-6 months to maintain optimal odor absorption and airflow efficiency. Turn off the power before starting. Locate the filter, typically found in the base or near the fan. Gently pull it out and dispose of it properly. Install a new filter, ensuring it clicks securely into place. Replace the cover if applicable. Regular replacement prevents grease and odor buildup, ensuring the hood performs effectively. Refer to the manual for specific instructions or diagrams if needed. Always use a genuine Venmar replacement filter for best results.
5.3 Checking and Replacing the Aluminum Filters
Regularly inspect and clean the aluminum filters in your Venmar Jazz Range Hood to ensure optimal performance. These filters should be cleaned every 1-2 months using mild soap and warm water. Gently scrub to remove grease buildup, then rinse and dry thoroughly before reinstalling. If damaged or excessively worn, replace the filters to maintain proper airflow. For stubborn stains, soak the filters in a mixture of baking soda and water. Always turn off the hood before servicing. Clean filters improve suction power and reduce odors, ensuring efficient ventilation in your kitchen. Refer to the manual for specific cleaning recommendations.
5.4 Cleaning the Light Bulbs and Covers
For optimal lighting performance, regularly clean the light bulbs and covers of your Venmar Jazz Range Hood. Before cleaning, ensure the hood is turned off and cool to avoid injury. Gently remove the light covers and wash them with mild soap and warm water. Use a soft cloth to wipe the bulbs, removing any grease or dust buildup. Inspect for damage or discoloration, and replace bulbs if necessary. Reinstall the covers securely after cleaning. Clean light components ensure bright, even lighting for cooking. Regular maintenance also prevents dust accumulation, which can reduce light efficiency. Always refer to the manual for specific cleaning instructions to maintain your range hood’s performance.

Troubleshooting Common Issues
This section helps identify and resolve common problems with your Venmar Jazz Range Hood, such as malfunctioning lights or reduced airflow, ensuring optimal performance and efficiency.
6.1 The Range Hood Is Not Turning On
If the Venmar Jazz Range Hood fails to turn on, first check the power connection. Ensure the hood is properly plugged into a functioning outlet and that the circuit breaker hasn’t tripped. Verify that all electrical connections during installation were securely made. If the issue persists, inspect the power cord for damage or wear. Consult a licensed electrician if the problem relates to wiring. Always refer to the manual for specific troubleshooting steps to avoid further complications. Regular maintenance and proper installation are key to preventing such issues and ensuring smooth operation.
6.2 Low Airflow or Poor Suction
Low airflow or poor suction in the Venmar Jazz Range Hood can result from clogged filters or improper ductwork installation. Ensure the aluminum and charcoal filters are clean or replaced as needed. Check the ducting for blockages, kinks, or disconnected sections, as these can significantly reduce airflow efficiency. Verify that the ductwork layout is as short and straight as possible, minimizing bends and elbows. If using non-ducted mode, ensure the charcoal filter is installed correctly. Regularly cleaning the hood and filters can also improve performance. For optimal suction, maintain the recommended distance between the hood and the cooking surface, typically no more than 30 inches above the stove.
6.3 Excessive Noise During Operation
Excessive noise during operation of the Venmar Jazz Range Hood can be caused by improper installation, loose components, or debris in the ductwork. Ensure the hood is securely mounted and all screws are tightened. Check for any blockages or kinks in the ductwork, as these can create vibrations and noise. Verify that the fan is properly balanced and free from obstructions. If the issue persists, inspect the damper or backdraft valve for proper function. Cleaning the fan blades and motor area can also help reduce noise. For persistent problems, consult the manual or contact a professional to ensure the installation meets manufacturer specifications.
6.4 The Lights Are Not Working
If the lights on your Venmar Jazz Range Hood are not working, check the bulb connections and ensure they are securely tightened. Replace any loose or damaged bulbs with the specified JC, 12V, 20W halogen bulbs (G-4 Base). Gently push the rim upward to access the bulbs. Verify that the light switch is functioning properly and that no debris is obstructing the light covers. If the issue persists, inspect the electrical connections for any damage or loose wires. Ensure the hood is properly installed and grounded. For persistent problems, consult the manual or contact Venmar customer support for assistance. Always use the recommended bulb type to maintain performance and safety.

Safety Precautions and Tips
Always ensure the range hood is installed and maintained correctly to prevent fire hazards. Keep the area around the hood clear of flammable materials and ensure proper ventilation during cooking to avoid grease buildup and potential fires.
7.1 General Safety Guidelines
Always follow the Venmar Jazz Range Hood manual to ensure safe operation. Keep flammable materials away from the hood and cooking area. Regularly clean grease and debris to prevent fire hazards. Ensure proper ventilation to avoid carbon monoxide buildup. Never modify the hood or its components without professional guidance. Always turn off the hood before cleaning or performing maintenance. Keep children away from the hood while it is in operation. Avoid overheating cookware, as it can release harmful fumes. Refer to the manual for specific safety instructions tailored to your model. Proper adherence to these guidelines will ensure a safe and efficient cooking environment.
7.2 Fire Safety and Prevention Tips
Prevent fires by ensuring your Venmar Jazz Range Hood is installed and maintained correctly. Keep flammable materials, such as curtains or towels, away from the hood and cooking area. Regularly clean grease and food particles, as buildup can ignite during high heat. Never leave cooking unattended, especially when using oil or grease. Avoid overheating cookware, as it can release harmful fumes and sparks. Ensure the hood is turned on during cooking to vent smoke and fumes. Keep a fire extinguisher nearby and know how to use it. Refer to the manual for specific fire safety recommendations tailored to your model.
7.3 Proper Ventilation Practices
For optimal performance, ensure your Venmar Jazz Range Hood is installed at the recommended height of 30 inches above your cooking surface. Maintain proper ventilation by running the hood before cooking to prevent moisture buildup. Use a straight, short duct run for ducted installations to maximize airflow efficiency. Clean or replace filters regularly to avoid restricting air circulation. Keep ductwork clear of obstructions and ensure vent caps are securely installed outdoors. Avoid covering the vent with screens or mesh, as they can trap debris. Regularly inspect the system for blockages or damage. Proper ventilation practices enhance safety and efficiency, ensuring your kitchen remains smoke and odor-free.
7.4 Avoiding Common Installation Mistakes
To ensure a safe and efficient installation of your Venmar Jazz Range Hood, avoid common errors. Always follow the recommended height of 30 inches above the cooking surface for optimal performance. Ensure the ductwork is planned correctly, avoiding sharp turns or excessive bends, as this can reduce airflow. Never use flexible ducting in place of rigid ducts, as it can restrict performance. Verify that the vent cap is properly installed outdoors to prevent backdrafts. Avoid connecting the hood to a shared duct system with other appliances. Double-check electrical connections to match the hood’s specifications. Finally, ensure all screws and brackets are securely tightened to prevent vibration or instability during operation.

Warranty and Customer Support
The Venmar Jazz Range Hood comes with a 1-year limited warranty. For support, contact Venmar via their website or phone. Product registration is required.
8.1 Understanding the Warranty Terms
The Venmar Jazz Range Hood is covered by a 1-year limited warranty. This warranty applies to parts and labor, ensuring defects in materials and workmanship are addressed. Coverage begins from the purchase date and requires product registration; Damage due to misuse, improper installation, or normal wear and tear is excluded. For full details, refer to the warranty section in the manual. Proper maintenance and adherence to installation guidelines are essential to uphold warranty validity. Customers can find warranty terms in the provided manual or on Venmar’s official website for comprehensive understanding.
8.2 Contacting Venmar Customer Service
For assistance with your Venmar Jazz Range Hood, contact Venmar Customer Service at 1-800-… (as specified in the manual). Support is available to address inquiries, troubleshooting, or warranty-related issues. Customers can also reach out via email or through Venmar’s official website. Ensure to have your product model number (e.g., VJ603302SS) and purchase details ready for efficient service. The website also provides resources like FAQs and downloadable manuals for added convenience. Venmar’s customer service team is dedicated to helping you resolve any concerns promptly and effectively, ensuring your range hood performs optimally and meets your expectations.
8.3 Registering Your Product
Registering your Venmar Jazz Range Hood is essential for warranty validation and accessing exclusive customer support. Visit Venmar’s official website and navigate to the product registration section. Provide the required details, including the model number (e.g., VJ603302SS), purchase date, and your contact information. Ensure all data is accurate to avoid delays. Registration confirms your product under warranty and allows Venmar to provide tailored assistance. Keep a copy of your registration confirmation for future reference. This process is straightforward and ensures you receive the full benefits of your purchase, including updates and enhanced support services from Venmar. Prompt registration is recommended to maintain warranty coverage.
8.4 Finding Authorized Service Providers
To ensure your Venmar Jazz Range Hood is serviced correctly, use only authorized providers. Visit Venmar’s official website and navigate to the “Where to Buy” or “Service Centers” section. Enter your location to find nearby authorized service providers. Additionally, contact Venmar’s customer service at 1-800-… for assistance in locating a certified technician. Always verify the provider’s authorization to avoid unauthorized repairs, which may void your warranty. Using authorized service ensures compliance with manufacturer standards and maintains your product’s performance and warranty coverage. This step is crucial for resolving issues efficiently and upholding the quality of your range hood. Promptly address any repairs through these channels for optimal results.
The Venmar Jazz Range Hood offers a blend of style, efficiency, and reliability, making it a great addition to modern kitchens. By following the manual, users can ensure optimal performance, troubleshoot common issues, and maintain their unit effectively. This guide provides comprehensive insights to help you make the most of your cooking experience while adhering to safety and maintenance best practices. Enjoy your enhanced kitchen experience with the Venmar Jazz Range Hood!
9.1 Summary of Key Points
The Venmar Jazz Range Hood manual emphasizes proper installation, maintenance, and safety for optimal performance. It highlights the importance of regular cleaning, filter replacement, and ductwork planning. The hood’s design ensures efficient airflow and minimal noise, while its lighting system enhances cooking visibility. Users are advised to follow safety guidelines to prevent fires and ensure proper ventilation. The manual also provides troubleshooting tips for common issues like poor suction or non-working lights. By adhering to the guidelines, users can extend the product’s lifespan and enjoy a superior cooking experience. This summary underscores the manual’s role in maximizing the hood’s functionality and user satisfaction.
9.2 Final Tips for Optimal Performance
For the best performance of your Venmar Jazz Range Hood, ensure the hood is installed at the recommended height above your cooktop. Regularly inspect and clean the ductwork to maintain airflow efficiency. Always use the appropriate filters and replace them as needed to prevent reduced suction. Avoid blocking the vent with objects, as this can hinder performance. Additionally, ensure proper ventilation in your kitchen to maximize the hood’s effectiveness. By following these tips, you can enjoy a hassle-free cooking experience and extend the lifespan of your range hood.